
 08-29-2008, 05:01 PM
|
#1 | ||
|
Hall Of Famer
Join Date: Dec 2002
Location: Mass.
|
My Home Repair Dynasty
As anyone who owns a home knows one of the things that goes along with owning a home is the home improvements that are needed or desired over time.
There are all kinds of other dynasties, so I figured I would dedicate one to my home repairs  Considering the amount of time I have spent this summer on fixing or building things, it is a pretty large part of my life now. Considering the amount of time I have spent this summer on fixing or building things, it is a pretty large part of my life now.I figure that it also would be a good place for others to get ideas of things they can do, or people can give comments or suggestions where I could use it. |
||

|

|
|
08-29-2008, 05:15 PM
|
#2 |
|
Hall Of Famer
Join Date: Dec 2002
Location: Mass.
|
Not my first project since I bought this house last October, but the first pictures I will post are of two different projects that I had. One planned and one unplanned.
This is what the Northeast corner of my backyard used to look like when I first moved in:  Edit: Found a second picture from the winter that shows it a bit better:  Two things to look at in this picture is my north fence and then the Northeast corner where old landscaping lumber used to wall up a section that had a tree, a huge rock, a bush, a bunch of weeds and other random things (like an old litter box someone threw back there in the bushes). The first thing that I had to repair was unplanned in the spring. With a storm that brought very strong winds, the Northeast four sections of my north fence got blown down and the actual fence posts were snapped at the ground level. I didn't know anything about building fences or repairing fences, so used the internet as my guide. First step was that I had to dig out the bottom half of the old posts which went about 2 feet deep into the ground. I used a shovel and crowbar to dig them out, but if anyone knows about Massachusetts soil, it is extremely rocky, so the actual task of removing the old snapped fence posts took roughly 4-5 hours for me to remove three of them. Once the old fence posts were removed, I dug three new holes in the same spot for the new fence posts that I bought at a local fencing store. The old fence posts were only put 2 feet into the ground, but everything I read said that they should be 1/3 of the post burried in the ground. I got 9 foot posts so that meant i had to dig holes 3 feet deep. With a post hole digger I bought at Home depot, that took me an additional 4-5 hours of work on a different day. I placed some gravel at the bottom of each of the holes (a suggestion I read online) and then proceeded to put in the first fence post. I decided to put up the old sections of fence as they were undamaged, but with just new posts. It took me only about an hour to put up the first two sections along with the first two posts. The last one was more of a problem as I found the new posts I bought were a slight bit bigger than the old ones (maybe 1/2 of an inch), but by the third one it caused the fencing to be off from the holes. I had to re-dig my third hole and ended up having to buy a fourth post and put it in next to the back fence instead, so that took me an extra few hours that I had not planned on, but in the end it worked just as well. 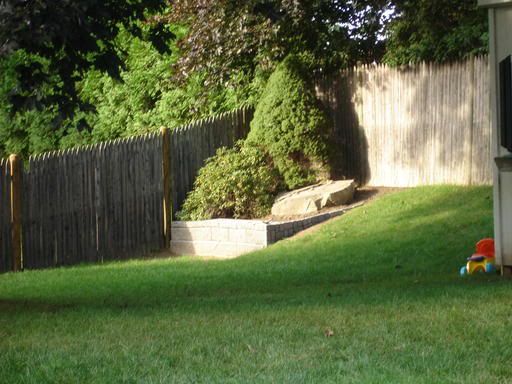 You can see here the fence posts a slightly lighter color because they have not aged as much as the fence. The second project in this picture you can already see was to rip out all of the old rotted lumber that served as a wall, and to build up a new wall. I found out about these interlocking cement blocks called Allen Blocks that I used to build the wall. They were only a few dollars each, and for the entire wall it only cost about $120.00 total. I was worried that it would look horrible, but I was pretty impressed with how it turned out. I started by pulling up all of the old lumber, then I dug out a wide (about 1 foot wide) ditch the length of the wall which also was about 4-5 inches deep for the first row of blocks. After one row was placed down, I used a half block on the end so that the different rows would be alternating. With these blocks, after each row, you are supposed to fill up the insides of them with various stone or gravel or such to provide it weight and sturdiness. I hope I didn't mess up here, but I just filled them up with dirt instead. Hopefully that doesn't cause problems down the road, but i figured if it does, this would be easy enough to re-do. I then build the next two rows, with the alternating blocks using the same idea until the top I had caps to go on the blocks. For this I had to use cement proxy to make sure the caps don't get knocked off. After about 2 afternoons of work, I had a pretty nice wall there. I put my wife and daughters to work pulling the weeds and the entire corner looks much nicer now I think. Next year they plan on planting some small pretty flowers there to make the section look nice. I'll leave that up to them as I am not really a flower type of guy. Last edited by Alan T : 08-29-2008 at 05:27 PM. |
|
|
|
|
08-29-2008, 05:38 PM
|
#3 |
|
lolzcat
Join Date: Oct 2000
Location: sans pants
|
That looks really good. Great improvement.
__________________
Superman was flying around and saw Wonder Woman getting a tan in the nude on her balcony. Superman said I going to hit that real fast. So he flys down toward Wonder Woman to hit it and their is a loud scream. The Invincible Man scream what just hit me in the ass!!!!! I do shit, I take pictures, I write about it: chrisshue.com |
|
|
|
 |
| Currently Active Users Viewing This Thread: 1 (0 members and 1 guests) | |
| Thread Tools | |
|
|


